

Aside from the usual favorite holidays, we are confident Halloween takes the cake for fun décor and celebration. With Halloween, you can dress up as your favorite character, eat as many sweets as possible, and dance until your feet hurt! Until you reach the dancing portion of the evening, why not partake in some festive Halloween treats to share with your colleagues? From ghostly shaped marshmallows, to spooky cat brownies, the possibilities are endless! Check out these five Halloween treats to make for the office in honor of the spooky holiday.
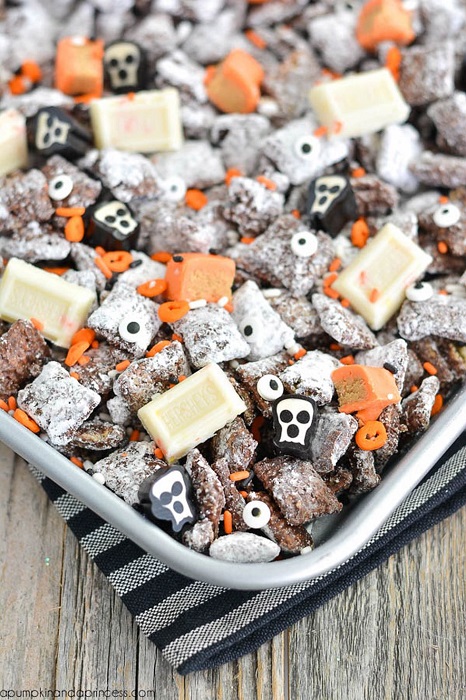
Halloween Muddy Buddies
This festive snack is perfect for sharing with large crowds! This Halloween treat includes all the festive candies in one place. It is easy to make and very quick to put together. All you will need is Rice Chex cereal, chocolate chips, peanut butter, butter, vanilla extract, powdered sugar, Kit Kat bar pieces, Hershey candies, and sprinkles.
In a large bowl, microwave chocolate chips, peanut butter and butter for 1 minute; stir. Return to microwave for 30 seconds or until mixture is smooth. Stir in vanilla extract. Combine chocolate mixture with Chex cereal. Stir until evenly coated. Combine cereal and powdered sugar; mix until well coated. Add remaining candy pieces and sprinkles! Store in airtight container and let it sit together until ready to serve.
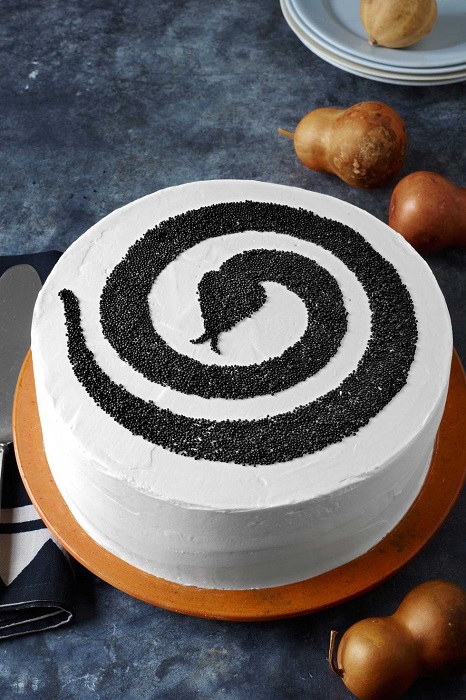
Sneaky Snake Cake
This cake looks just as spooky as it sounds! Simply bake a round cake and add your own décor to give it its spooky glare. If you do not have a snake template, you can use this snake template along with some black nonpareils. To bring this cake to life, all you will need to do is Prepare your favorite cake recipe and bake in two 9-inch round cake pans. Let the cakes cool completely.
Frost one of the cake tops with store bought icing. Place the bare cake on top of the frosted top. Frost both cakes together. Print the template; place your printout beneath a sheet of parchment and trace the snake design. Cut parchment as indicated on the template to create a stencil. Frost the remaining cake top. Place the cake stencil on top of the two cakes. Fill stencil with nonpareils. Chill cake for 15 to 20 minutes, and let your guests enjoy!
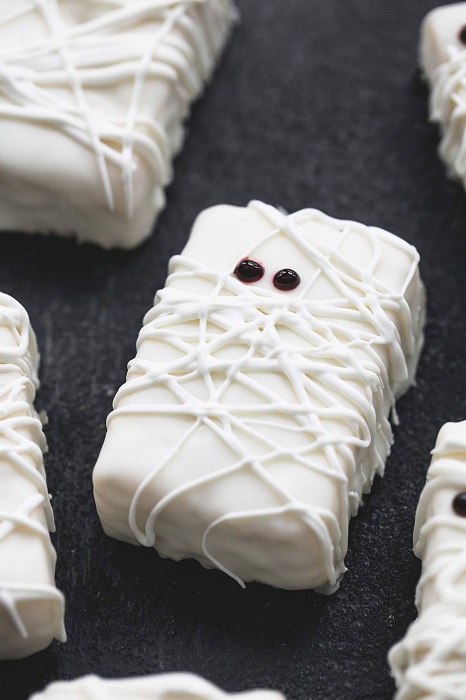
Rice Krispy Treat Mummies
These fun treats are so cute you would not want to eat them. They are super fun to make and easy to do with young children. The only items you will need to pull this snack off are six snack-size rice Krispy treats, 3 cups of white chocolate bars, black edible piping gel or icing, and red food coloring. Unwrap rice Krispy treats and set aside. Place white chocolate chips in a microwave-safe bowl and microwave on half power for 2 minutes. Stir and return to microwave for 20 seconds at a time (still on half power) stirring after each until chocolate is completely melted and smooth.
Dip rice Krispy treats in the chocolate being sure to coat the front and sides (the backside can remain uncovered). Place uncovered-side-down on a foil-lined plate or small baking sheet. Repeat process with remaining rice Krispy treats. Transfer plate/baking sheet to fridge or freezer to cool for 2-3 minutes. While treats are cooling, spoon melted white chocolate into a small zip lock bag. Remove treats from fridge/freezer. Use scissors to snip off a tiny bit of one bottom corner of the chocolate-filled bag, and then drizzle chocolate in a random pattern over the treats to create the look of mummy wrapping. Return treats to fridge or freezer for 1-2 minutes.
Pipe two dots onto each rice Krispy treat to create mummy eyes. (Optional step, dip a Q-tip in red food coloring and dap two dots onto the rice Krispy treats before adding the eyes to create a creepy “bloodshot” look.) Serve or store in airtight container up to 1 week.
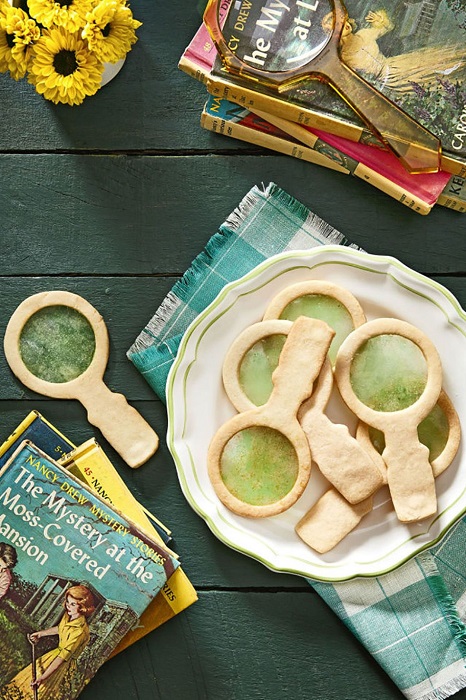
Mini Mirror-Mirror Cookies
Who doesn’t love a personalized mirror-mirror that is tasty and tells you whatever you want? Okay, well it may not tell you everything you want, but they sure are tasty. All you will need is flour, salt, butter, vanilla extract, almond extract, eggs, finely crushed pineapple Lifesavers candy, and finely crushed green apple Lifesavers candy.
The recipe is simple and as follows: Whisk together flour and salt in a bowl. Beat butter, sugar, and extracts on medium-high speed with an electric mixer until light and fluffy, 1 to 2 minutes. Beat in egg until blended. Reduce mixer speed to low, and gradually add flour mixture to butter mixture, beating just until flour is incorporated. Divide dough in half, and flatten into two disks. Wrap in plastic wrap, and chill at least 2 hours or up to 3 days.
Preheat oven to 325°F. Line three baking sheets with parchment paper. Working with one disk at a time, on a lightly floured work surface, roll dough to 1/4-inch thickness. Use a 5 3/4-inch-long magnifying glass-shaped cookie cutter to cut as many cookies as possible; place on prepared baking sheets. Use a 2-inch round cutter to remove center from each cookie; re-roll scraps, and repeat process. Freeze 10 minutes. Stir together candies in a bowl. Bake until golden brown around edges, 10 to 12 minutes. Cool 3 minutes. Sprinkle crushed candies in center of each cookie, dividing evenly. Bake until candies melt, 2 to 3 minutes; swirl with a toothpick to mix colors. Cool completely on baking sheets on a wire rack, and enjoy!
Poison Candy Apples
This creepy take on Snow White’s poisonous apple is perfect for bringing to the office. It is healthy and spooky all in one, which makes it the perfect office treat to share with your coworkers. In basic terms, all you would need is granny smith apples, food coloring, light corn syrup, candy apple sticks. Wash and dry apples thoroughly. Place on a baking sheet and poke firmly with dowels. Line a second baking sheet with buttered parchment paper, and set aside.
Place a candy thermometer in a medium saucepan and add sugar, 3/4 cups water, and corn syrup. Place over medium heat; whisk until sugar is dissolved. Let the temperature rise without stirring until it reaches the hard-crack mark at 310 degrees. Remove pan from heat. Carefully remove thermometer, and add food coloring. Swirl pan to mix in the color completely. Swipe and twirl the apple through the candy, shake off excess, and place on buttered baking sheet. Repeat with remaining apples.

Related: 5 Healthy Snack for the Office
Whoever said spooky could not be tasty was dead wrong! Is Halloween your favorite time of the year? If so why? Have you tried any of these Halloween treats? What recipes would you like to share with the community that you just cannot pass up on Halloween? Check us out on our social media accounts Twitter and Instagram for all the newest updates and tips. Also, do forget to follow us on our Facebook page and comment below.